Friday, June 8, 2012

customize picklist in crm 4.0

just open OnLoad event:

var ShipCode = crmForm.all.address1_shippingmethodcode;
ShipCode.style.display = "none";
var addDiv = document.createElement("<div style='overflow-y:auto; height:100px; border:1px#6699cc solid; background-color:#ffffff;' />");
ShipCode.parentNode.appendChild(addDiv);
for( var i = 1; i < ShipCode.options.length; i++ )
 {
    var SCOption = ShipCode.options[i];
   
    var addInputCheckBox = document.createElement("<input type='checkbox' style='border:none; width:20px; align:left;' />" );
   
    var addLabel = document.createElement( "<label />");
    addLabel.innerText = SCOption.text;
    var addBr = document.createElement( "br");
   
    ShipCode.nextSibling.appendChild(addInputCheckBox);
    ShipCode.nextSibling.appendChild(addLabel);
    ShipCode.nextSibling.appendChild(addBr);
 }

Tuesday, March 6, 2012

inherit account information from contact

Hello all,
Here i have code that inherit account information from contact
add this code in the OnChange event of the parentcustomerid field


var accountid = crmForm.all.parentcustomerid.DataValue[0].id;
var authenticationHeader = GenerateAuthenticationHeader();

// Prepare the SOAP message.
var xml = "<?xml version='1.0' encoding='utf-8'?>"+
"<soap:Envelope xmlns:soap='http://schemas.xmlsoap.org/soap/envelope/'"+
" xmlns:xsi='http://www.w3.org/2001/XMLSchema-instance'"+
" xmlns:xsd='http://www.w3.org/2001/XMLSchema'>"+
authenticationHeader+
"<soap:Body>"+
"<Retrieve xmlns='http://schemas.microsoft.com/crm/2007/WebServices'>"+
"<entityName>account</entityName>"+
"<id>"+accountid+"</id>"+
"<columnSet xmlns:q1='http://schemas.microsoft.com/crm/2006/Query' xsi:type='q1:ColumnSet'>"+
"<q1:Attributes>"+
"<q1:Attribute>transactioncurrencyid</q1:Attribute>"+
"</q1:Attributes>"+
"</columnSet>"+
"</Retrieve>"+
"</soap:Body>"+
"</soap:Envelope>";
// Prepare the xmlHttpObject and send the request.
var xHReq = new ActiveXObject("Msxml2.XMLHTTP");
xHReq.Open("POST", "/mscrmservices/2007/CrmService.asmx", false);
xHReq.setRequestHeader("SOAPAction","http://schemas.microsoft.com/crm/2007/WebServices/Retrieve");
xHReq.setRequestHeader("Content-Type", "text/xml; charset=utf-8");
xHReq.setRequestHeader("Content-Length", xml.length);
xHReq.send(xml);
// Capture the result.
var resultXml = xHReq.responseXML;

// Check for errors.
var errorCount = resultXml.selectNodes('//error').length;
if (errorCount != 0)
{
 var msg = resultXml.selectSingleNode('//description').nodeTypedValue;
 alert(msg);
}
// Display the retrieved value.
else
{
//alert(resultXml.selectSingleNode("//q1:transactioncurrencyid").nodeTypedValue);
}


// Create an array to set as the DataValue for the lookup control.
var lookupData = new Array();
// Create an object to add to the array.
   var lookupItem= new Object();
// Set the id, typename, and name properties to the object.
   lookupItem.id = resultXml.selectSingleNode("//q1:transactioncurrencyid").nodeTypedValue;
   lookupItem.typename = 'transactioncurrency';
   lookupItem.name = resultXml.selectSingleNode("//q1:transactioncurrencyid").getAttribute("name");
// Add the object to the array.
   lookupData[0] = lookupItem;
// Set the value of the lookup field to the value of the array.
   crmForm.all.transactioncurrencyid.DataValue = lookupData;


Now u can change the code as per your requirement.
if u have any doubt then u can ask freely

Monday, February 6, 2012

disable field and hide/unhide field, section and form

disable field


    crmForm.all.new_link.disabled = false;  //disable the field
    crmForm.all.new_link.disabled = true;   //enable the field

hide/unhide field


    crmForm.all.<fieldname>_c.style.display = "none";
    crmForm.all.<fieldname>_d.style.display = "none";

hide/unhide section


    crmForm.all.<fieldname>.parentElement.parentElement.parentElement.style.display="none";

   another way :


    document.getElementById("tab<tabNo>").childNodes[0].rows[<sectionNo>].style.display = "none";
    // <tabNo> is zero based tab number from left. <sectionNo> is zero based section number from top.


hide/unhide tab


   document.getElementById("tab<tabNo>Tab").style.display = "none";
   // <tabNo> zero based tab number from left


Wednesday, February 1, 2012

Button in CRM


it is very easy to create button in CRM.

just follow the step.

1. create one text attribute.
2. named new_link.
3. put the below code in OnLoad vent of the form.


//CRM 4.0-Style button creator
//Creates a Button from a Textattribute.
//For every Button you need, create a nText Attribute and place it on the Form
//mario raunig, world-direct 04/2008

function create_button_from_textattribute(fieldname, buttontext, buttonwidth,clickevent)
{
functiontocall=clickevent;
crmForm.all[fieldname].DataValue = buttontext;
crmForm.all[fieldname].style.borderRight="#3366cc 1px solid";
crmForm.all[fieldname].style.paddingRight="5px";
crmForm.all[fieldname].style.borderTop="#3366cc 1px solid";
crmForm.all[fieldname].style.paddingLeft="5px";
crmForm.all[fieldname].style.fontSize="11px";
crmForm.all[fieldname].style.backgroundImage="url(/_imgs/btn_rest.gif)";
crmForm.all[fieldname].style.borderLeft="#3366cc 1px solid";
crmForm.all[fieldname].style.width=buttonwidth;
crmForm.all[fieldname].style.cursor="pointer";
crmForm.all[fieldname].style.lineHeight="18px";
crmForm.all[fieldname].style.borderBottom="#3366cc 1px solid";
crmForm.all[fieldname].style.backgroundRepeat="repeat-x";
crmForm.all[fieldname].style.fontFamily="Tahoma";
crmForm.all[fieldname].style.height="20px";
crmForm.all[fieldname].style.backgroundColor="#cee7ff";
crmForm.all[fieldname].style.textAlign="center";
crmForm.all[fieldname].style.overflow="hidden";
crmForm.all[fieldname].attachEvent("onmousedown",push_button);
crmForm.all[fieldname].attachEvent("onmouseup",release_button);
crmForm.all[fieldname].attachEvent("onclick",functiontocall);
}

function push_button(){
window.event.srcElement.style.marginLeft="1px";
window.event.srcElement.style.marginTop="1px";
}

function release_button(){
window.event.srcElement.style.marginLeft="0px";
window.event.srcElement.style.marginTop="0px";
}

// tell the button what to do
function testfunction()
{
alert('Ta-da!');
}

// create the button
create_button_from_textattribute('new_link', 'new resource','84px',testfunction);

enjoy it

Tuesday, January 31, 2012

Validation on the field

here some simple code to validate the field of the form in crm


main  phone

var e = /^(\+91[\-\s]?)?[123456789]\d{9}$/;


if(crmForm.all.telephone1.value.search(e) == -1)
{alert('number should be proper');
crmForm.all.telephone1.value = '';                  //to make field blank.
crmForm.all.telephone1.SetFocus();               //to set the focus on particular field.
event.returnValue=false;
}

fax

var e = /^[+]\d{12}$/;


if(crmForm.all.fax.value.search(e) == -1)
{alert('number should be proper');
crmForm.all.fax.value = '';
crmForm.all.fax.SetFocus();
event.returnValue=false;
}


city

var e = /^[a-zA-Z\s]+$/;
if (crmForm.all.address1_city.value.search(e)==-1)
{
  alert("Only alphbets or space allowed");
crmForm.all.address1_city.value = '';
crmForm.all.address1_city.SetFocus();
event.returnValue=false;
}


zip postal code

var e =/^\d{6}$/;


if(crmForm.all.address1_postalcode.value.search(e) == -1)
{alert('number should be proper');
crmForm.all.address1_postalcode.value = '';
crmForm.all.address1_postalcode.SetFocus();
event.returnValue=false;}

first name

var e = /^[a-zA-Z\s]+$/;
if (crmForm.all.firstname.value.search(e)==-1)
{
  alert("Only alphbets or space allowed");
 crmForm.all.firstname.value = '';
crmForm.all.firstname.SetFocus();
event.returnValue=false;
}

state/province

var e = /^[a-zA-Z\s]+$/;
if (crmForm.all.address1_stateorprovince.value.search(e)==-1)
{
  alert("Only alphbets or space allowed");
crmForm.all.address1_stateorprovince.value = '';
crmForm.all.address1_stateorprovince.SetFocus();
event.returnValue=false;
}

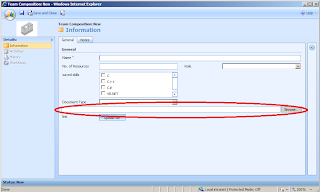
file browse button


very easy to create a file browse button.


follow the below step.

1. add one text attribute named new_filepath which store the path of the file that you have browse.
2. then add the following code in the OnLoad event of the form.


inputF = document.createElement('input');
inputF.type = 'file';
inputF.onchange = inputF_onChange;


tbl = crmForm.all.tab0.getElementsByTagName('table');
if (tbl && tbl[0])
{
    tbl[0].parentNode.insertBefore(inputF, tbl[0]);
}


function  inputF_onChange()
{
if (inputF && inputF.value)
crmForm.all.new_filepath.DataValue = inputF.value;
}


enjoy it.

Checkbox in crm 4.0

yes,it is possible to create checkbox in crm 4.0

the step which you have to follow is...


  • create one picklist named new_picklist(you can keep different name also but then you have to change the name in the following code).
  • then create another text attribute to store the value of checkbox.
  • then put the following code in the Onload event of the form.


var PL = crmForm.all.new_picklist;
var PLV = crmForm.all.new_picklistvalue;

if( PL != null && PLV != null )
{
  PL.style.display = "none";
  PLV.style.display = "none";

  // Create a DIV container
  var addDiv = document.createElement("<div style='overflow-y:auto; height:80px; border:1px #6699cc solid; background-color:#ffffff;' />');
  PL.parentNode.appendChild(addDiv);

  // Initialise checkbox controls
  for( var i = 1; i < PL.options.length; i++ )
  {
    var pOption = PL.options[i];
    if( !IsChecked( pOption.text ) )
      var addInput = document.createElement("<input type='checkbox' style='border:none; width:25px; align:left;' />' );
    else
      var addInput = document.createElement("<input type='checkbox' checked='checked' style='border:none; width:25px; align:left;' />' );
 
    var addLabel = document.createElement( "<label />");
    addLabel.innerText = pOption.text;
 
    var addBr = document.createElement( "
"); //it's a 'br' flag
 
    PL.nextSibling.appendChild(addInput);
    PL.nextSibling.appendChild(addLabel);
    PL.nextSibling.appendChild(addBr);
  }
 
  // Check if it is selected
  function IsChecked( pText )
  {
    if(PLV.value != "")
    {
      var PLVT = PLV.value.split("||");
      for( var i = 0; i < PLVT.length; i++ )
      {
        if( PLVT[i] == pText )
          return true;
      }
    }
    return false;
  }
 
  // Save the selected text, this filed can also be used in Advanced Find
  crmForm.attachEvent( "onsave" , OnSave);
  function OnSave()
  {
    PLV.value = "";
    var getInput = PL.nextSibling.getElementsByTagName("input");
 
    for( var i = 0; i < getInput.length; i++ )
    {
      if( getInput[i].checked)
      {
        PLV.value += getInput[i].nextSibling.innerText + "||";
      }
    }
  }
}